Showing posts with label Spellbinder's. Show all posts

Friday, August 10, 2018

Layering die cuts

Hello fellow stampers and card makers,

I hope you are off to good start to your weekend! Here's a card that I really enjoyed making. And it's almost all die cuts.


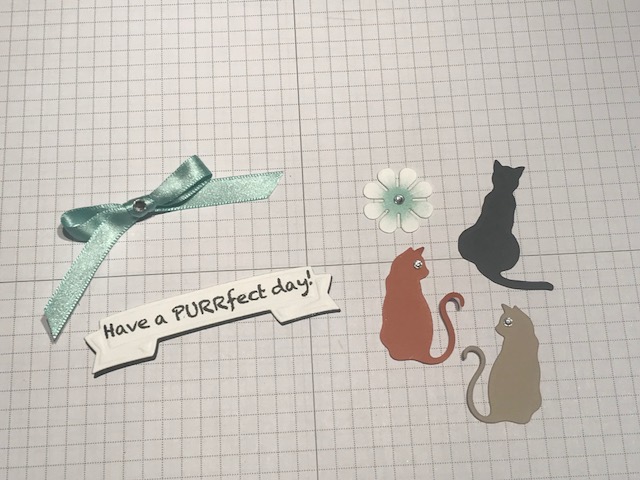
I first cut all the cardstock to the size of card I want and die cut the images. The base of the card is made from black cardstock and the background is made from teal. This layer is dry embossed using a honeycomb pattern. The cats are cut from three different colors - black, tan, and rust. The labels are cut from light teal or aqua, black and white.


I then made the embellishments. I used an aqua satin ribbon with a crystal rhinestones that will be attached to the main focal point. The sentiment is stamped in black on the white banner label. To give it added dimension, a black banner is also cut and adhered slightly offset to make a shadow. I also added rhinestones as eyes to the cats and as the center of the flower (used a sponge dauber to color the center of the white flower).


To make the focal point of the card, I cut the aqua colored labels in half as shown below. The aqua labels are the same size as the white. I adhered each end of the longer label under the black label. Then I adhered the smaller aqua labels under the white one with the aqua edge just visible. Then I attached that piece on top of the black label. Layered on the cat die cuts so the tails just touch (almost looks like a heart). Then attach the label and the flower, and the focal point is done.


I attached the dry embossed background piece to the card base. Then added the layered label focal point and the sentiment. I also added a white piece of cardstock to the inside of the card and stamped paw prints in the bottom corners as well on the envelope.


This makes a great birthday card for those cat lovers in your life. I hope you give die layering a try to make focal points for your creations.

Happy stamping!

Kathie K.

Monday, July 30, 2018

Inspiration for creating cards

Hello fellow card makers!

Like most of you, I find inspiration by looking at other handmade cards - I'm sure some of you have given me loads of inspiration. But recently, I have tried to think outside the box and look for inspiration in the unexpected.

While dining out with my family at a Chinese restaurant, I noticed a piece of wall art. I don't think the piece is anything special but I did get inspired for a new card design. Below, the first image is the wall art (sorry its so blurry) and the second image is the card I made from that inspiration.  What do you think?


I made the frame with black mirror cardstock. It adds a nice shine to the card. I used two rectangle nesting dies from Spellbinders to make the frame. Then I cut four - 1/8" wide strips and adhered them to the frame with each piece slightly larger than the frame.

I wanted the card to be almost 3D. I think dimension really adds interest. I used dimensionals under the black frame, the white panel and the vase. To make sure I had the vase in the right spot, I stamped the vase directly on the paper. It was really easy then to position the bamboo stamp in the right spot. I also stamped another vase on a scratch piece of white cardstock, cut it out and adhered it with dimensionals directly on top of the first image.

For this card, I used stamps from three different stamps sets. I just mixed and matched until I found the right look. To add sparkle, I used some black rhinestones that I had in my stash. I think they really work with my design.

I also find inspiration from quilts, stained glass windows, t-shirts, postcards, and so many other things. When something catches my eye, I almost immediately start thinking about a new card design.

Now go - get inspired!

Happy stamping!
Kathie K.


Saturday, July 28, 2018

Stretching Your Dies For Stunning Results

Hello fellow stampers and card makers!

I will admit, I am addicted to die cutting. There are so many die sets and bundles on the market its sometimes hard to see beyond what the dies were originally designed to do. Well that's easier to do than you think.


For this first communion card, I mixed and matched several brands and designs to make a stunning focal point.

I used white and gold shimmer paper although its hard to tell from the photo. It's not necessary to use shimmer paper but it does make the card that much more special and elegant. On top of the base card, I layered a slightly smaller lavender piece that I had dry embossed. Using a slightly smaller white piece, I die cut the ornate oval (Spellbinders). For the chalice, I used a circle die from Stampin' Up. I cut the top 1/3" off to made the bottom. The host above the chalice is done using two sizes of circle punches.


The finishing touches include embossing the sentiment in gold which was cut using a banner punch. I add sheer lavender ribbon for the extra special touch.

Start thinking outside the die box, and mix and match for stunning results.  I hope you give this a try.

Happy stamping!

Kathie K.

Thursday, March 1, 2018

Die cut peacock with oval frames tutortial

Hello fellow stampers and card markers,

I have fallen in love with the Color Layering Peacock stamp and die set from Hero Arts! This is one of the easiest stamps to layer.  And with three layers of the color, the color combinations are almost endless.

The card I'm going to show you how to make has multiple layers but super easy and fun to do.


Here's what you will need to make the same card:

  • Bermuda Bay cardstock - 4 1/4 x 11
  • Whisper white cardstock - 4 1/8 x 5 3/8 (cut 2), 4 x 5 1/4 an scrap piece for the peacock
  • mirror gold - 4 1/2 x 5 1/2
  • Vellum - 1 1/8 x 4
  • gold embossing powder
  • Spellbinder's dies, classic ovals, Oval Ironwork, and Floral Ovals
  • Inks pads: Versamark, Bermuda Bay, Island Indigo, Marina Mist, and Dapper Denim
  • Ink blending tools (Smoothies, sponges, etc)
  • Die cutting machine
  • Embossing buddy
  • Heat tool
  • Crushed Curry marker
  • Dimensionals
The first thing you want to do is color your background.  You want to do this first so it will have enough time to dry before embossing. Starting with the lightest colors first, on the piece of white cardstock, use a blending tool with Marina mist and then add Bermuda Bay and Dapper Denim until it is completely covered. No two backgrounds will be exactly the same. Set aside to dry.

Next, stamp the peacock starting again with the lightest colors. Use Marina Mist and Dapper Denim on the peacock head and body. Use the Crushed Curry marker to color in the beak. Line up the tail feathers and first stamp Bermuda Bay. The outline stamp will be next - use Island Indigo. Next, stamp the tail spots in Versamark. Sprinkle with gold embossing powder. Emboss.


When working with dies, I like to die cut all of the pieces at the same time. I used the matching peacock die on the peacock. I use the large die from the Oval Ironwork set on the gold mirror paper. Once that was cut, I layered on the large oval die to cut out the frame. Next, I used the large Floral Oval frame and large oval together to make the frame. You will end up with three die cut pieces for the card and two extra ovals for another project.


To finish the background, use the feather stamp with Versamark all over the background piece. Pour gold embossing powder on each image and heat emboss.

You will also need to stamp a sentiment on the piece of vellum with Versamark. Make sure you leave a border on the left side to tuck under the peacock when you assemble. Before attaching to the card, cut the right side like a banner or anything decorative.

Now you are ready to put it all together. To make the frame focal point, glue the white oval frame on top of the mirror gold frame. Using dimensionals, adhere the frame to the background. For the peacock, use dimensionals on the places of the die cut image that will actually touch the frame. Tuck under the left edge of the vellum piece leaving the rest of it loose. Then glue down the background to the card base.

Use the last piece of white cardstock for the inside of the card. Stamp feathers using the same inks as the background.  Do the same thing on the envelope. And your card is done! Wow - just beautiful!


I used a birthday sentiment but any one will work. I think my next one will be for Mother's Day.

Happy stamping!

Kathie K.


Airplane easel birthday card

  Crafting Joy: A Beautifully Designed Handmade Birthday Card Birthdays are a celebration of life, love, and the joy of making memories. Wha...