Hello stampers and card markers,
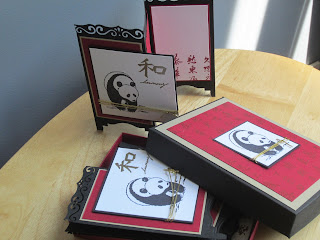
I have always loved Asian or oriental styles and themes, especially for greeting cards. I think they are so universal and can be used for any occasion or sentiment. I finally got around to make a set of Asian themed screen or room divider cards. The instructions are below.
There are lots of videos and tutorials about how to make these cards - here are few tips that worked for me.
1. Make a prototype to make sure the finished size is what you want. Border punches used for the top of the screen are all different. Each one removes a different amount of cardstock slightly changing the finished size.
2. Use a label die cut if you don't have a punch. I do not have the label punch that is shown is most videos but I do have a label die and it works great. I was able to cut through two layers at a time and use the cut piece as a guide for the remaining panels.
3. Put embellishments on the first panel. You can embellish the inside panels but it may make the card harder to fold because of the extra layers of cardstock.
For the card set, I chose to stick with classic oriental colors - red, black and gold.
Cut a piece of cardstock for the screen base 11 x 5 1/2" and score at 2 3/4", 5 1/2" and 8 1/4". Keep in mind the border punch may remove more cardstock then the one I used - you may need to alter the dimensions slightly. This will make the screen panels. For the top of the screen, use a border punch that goes with your theme - really any punch will do. To make the feet of the screen, use a label punch or die like I have done here. Some punches will go through multiple layers. If you cut or punch the one at a time, be sure they are lined up the best you can.
For each panel, cut four 3 7/8" x 2 3/8" sections red. Dry emboss two of them and leave two smooth. I used a bamboo embossing folder but any kind will work. You are just adding some textured interest to the card.
For the first panel, layer one of the smooth red section onto a gold section that measures 4 x 2 1/2". This will be the front of the card. Then cut a black piece that's 3 3/8" square and white piece that is 3 1/4" square. Stamp an image on the white layer. I stamped the panda in black and embossed the harmony image with gold powder. You can use any kind of gold embellishment on the front - a gold tassel or brads would also be nice. I used a piece of gold cord wrapped around three times and then tied in a knot.
Adhere two of the embossed red sections to the 2nd and 4th panels. For the third panel, layer a piece of white that measures 3 6/8" x 2 3/8" onto the last piece of unembossed red cardstock. Stamp an image at the bottom being sure to leave plenty of space for a written note. Layer and adhere to the 3rd panel and your screen card is complete.
I made the box using the same cardstock and stamps. The box holds five cards and matching envelopes.
I hope you like this card set and give this technique a try. If you are interested in purchasing this set, please visit my Etsy shop here.
Happy stamping!
Kathie K.
This is my passion - sharing stamping, paper crafting and card making techniques and creative ideas to help inspire your creativity.
Subscribe to:
Post Comments (Atom)
Airplane easel birthday card
Crafting Joy: A Beautifully Designed Handmade Birthday Card Birthdays are a celebration of life, love, and the joy of making memories. Wha...

-
Hello fellow card makers, Thank you for visiting my blog! I have another fun-fold card for you. I call this a bay window fun-fold card - t...
-
Hello card makers, I have another fun-fold card tutorial for you. This is a center panel easel card - this was made for a birthday but can...
-
Crafting Joy: A Beautifully Designed Handmade Birthday Card Birthdays are a celebration of life, love, and the joy of making memories. Wha...


No comments:
Post a Comment