Sunday, August 26, 2018

Handmade flocked cards

Happy Sunday,

I have been reorganizing my craft supplies and found an oldie but goody - flocking. I completely forgot about this awesome product. It adds a touch of texture and dimension to any project. You can use a lot or just little. It can be used as a main color or as an embellishment. A little goes a long way so its also a good investment.

To use, you add flocking like you would glitter. Place a small amount of glue in the area you want flocked, and then add the flocking.  Shake off the excess back into the container. Its that easy!

Here are a couple of projects where I used just touch to add something special to the cards. The first one is a teddy bear new baby card. I added the flocking to the bear's feet.

For my next project, I used the flocking to highlight a specific area - the dog's ear. The die cut is embossed to show the dog's features. I used the embossing lines as a guide to place the glue. Again, this small amount of flocking added texture and extra dimension to this sweet card.


Flocking has many other uses. Here are just few more ideas:

  • snow - on trees or outdoor scenes
  • use to color scarfs, hats and sweaters instead of markers or pencils
  • can be used as sand in beach scenes or tree bark
Flocking comes in many different colors so the uses are endless. If you want flocking for specific stamped image, use Versamark with Heat 'n Stick powder. You apply the Heat 'n Stick powder just like embossing powder and heat. Once heated, the powder stays sticky. Apply the flocking and it will only stick to the embossed areas. Shake off the rest.

I hope you look at flocking a bit differently now. I just love using it.

Happy stamping!
Kathie K.


Friday, August 10, 2018

Layering die cuts

Hello fellow stampers and card makers,

I hope you are off to good start to your weekend! Here's a card that I really enjoyed making. And it's almost all die cuts.


I first cut all the cardstock to the size of card I want and die cut the images. The base of the card is made from black cardstock and the background is made from teal. This layer is dry embossed using a honeycomb pattern. The cats are cut from three different colors - black, tan, and rust. The labels are cut from light teal or aqua, black and white.


I then made the embellishments. I used an aqua satin ribbon with a crystal rhinestones that will be attached to the main focal point. The sentiment is stamped in black on the white banner label. To give it added dimension, a black banner is also cut and adhered slightly offset to make a shadow. I also added rhinestones as eyes to the cats and as the center of the flower (used a sponge dauber to color the center of the white flower).


To make the focal point of the card, I cut the aqua colored labels in half as shown below. The aqua labels are the same size as the white. I adhered each end of the longer label under the black label. Then I adhered the smaller aqua labels under the white one with the aqua edge just visible. Then I attached that piece on top of the black label. Layered on the cat die cuts so the tails just touch (almost looks like a heart). Then attach the label and the flower, and the focal point is done.


I attached the dry embossed background piece to the card base. Then added the layered label focal point and the sentiment. I also added a white piece of cardstock to the inside of the card and stamped paw prints in the bottom corners as well on the envelope.


This makes a great birthday card for those cat lovers in your life. I hope you give die layering a try to make focal points for your creations.

Happy stamping!

Kathie K.

Sunday, August 5, 2018

Vellum Cards

Hello fellow stampers and card makers,

I hope everyone is having a wonderful week. It's hard to believe it's August already. Like most of you, I love using vellum when making cards. I think it adds a little something extra - don't you agree. Here are a few of my favorite cards using vellum.

The first card is monochromatic with just one small pop of color, or in this case black, along with the peach and vellum cardstock. The flowers and leaves are created with Versamark ink and white embossing powder. Don't be afraid of embossing on vellum - you just need to be a little more careful about how much heat you are applying. I then used the matching dies to cut them out once they cooled. I then layered the flowers around the corners and added the sentiment. For me the main flower focal point was a little too transparent so that particular flower has two layers of embossed vellum.


The next example uses the same embossing technique but with a different color scheme and sentiment. But this time I added some color to the back of the embossed image. I think it gives it a watercolor look. This technique is super easy and you don't have to worry about staying inside the lines.


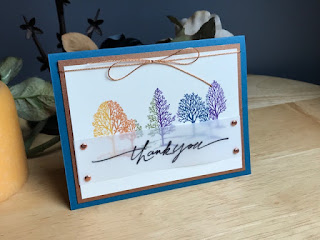
For this next card, I used the vellum for my sentiment - in this case, Thank You. I like that you can still see the pretty trees through the stamped sentiment. You can use any kind of black ink that you have.  I do find that Stazon works the best. You do need to let the ink the dry before handling or it will smudge.


The challenge with using vellum is the adhesive shows through. And no one wants to see that. For the first two cards, I strategically placed the adhesive in densely embossed areas to cover. For the third card, I used copper brads to attach the vellum to the card. They serve two purposes - an embellishment and adhesive.

I hope you give vellum a try if you haven't already. I just love the look and I think you will too.

Happy stamping!

Kathie K.

Wednesday, August 1, 2018

Personalized Cards

Hello fellow stampers and card markers!

I hope everyone is having a great day. Personalized gifts are always special - to give and to get. Everyone likes to have things with their names, initials or images that express their personality. Well cards can be personalized too.

I have a few examples of how to add that extra personal touch. You can personalize individual cards or make personalized gifts.

This first example is a card set I made for a gift. My friend Molly loves butterflies so this motif was perfect for her. And the card was super simple to make and she loved the set.


The next example I have was made for my aunt who loves send to cards.  I made her a set of cards in her favorite color and included both her initials. The dry embossing and pearl embellishments added a nice feminine touch. And she loved them!


My last example does not include initials but something they love. This birthday card was made for a customer that wanted to include her son's favorite beer.  I think this card is awesome - I love the look.
I found the label and logo online and used a circle die to cut both. The small logo is adhered directly to the crystal glazed bottle. The label is adhered to a larger label made from silver mirror paper.

I hope you give personalizing a try. Let us know how your friends and family like it.

Happy stamping!

Kathie K.

Bay Window Fun-fold Card Tutorial

  Hello fellow card makers, Thank you for visiting my blog! I have another fun-fold card for you. I call this a bay window fun-fold card - t...