Showing posts with label die cutting. Show all posts

Friday, April 22, 2022

Wave Birthday Card

 Realistic wave - looks complicated; super easy to make.

I just love making this card and watching the recipients feel the wave almost like it's real. The layered stamp set from The Ton creates this realistic wave and color combinations are endless.


Here's what you need:
  • Basic Black cardstock (Stampin Up): cut 8 1/2 x 5 1/2 (card base) and a layered piece - the size will depend on the size of the die cut wave layer
  • Blue layer (retired Stampin Up): 4 1/8 x 5 3/8
  • Basic White (Stampin Up): scraps for tags, approximately 1/4 sheet for wave image, and 4 1/8 x 5 3/8 for inside
  • Smoky Slate (Stampin Up) ink page
Stamp Sets - I like stretching my stamps sets by mixing and matching:
  • Wave - The Ton
  • Wave set - Stampin Up
To create the wave image, you will need three coordinating colors. Here's what I used to create this blue wave:
  • 1st layer - I combined Balmy Blue and Pool Party (both from Stampin Up) to get the light aqua color
  • 2nd layer - Pacific Point ink pad (Stampin Up)
  • 3rd Layer - Night of Navy ink pad (Stampin Up:
Die - the dies I used are all from different sets - I liked coordinating the stitched edges:
  • Stitched rectangle - My Favorite Things
  • Sailing Away - Stampin Up
  • Tasteful Labels - Stampin Up

Die cut all the stamped images and layer. Adhere down the inside layer and that is it! Super easy but looks like you spent hours. I hope you give this stamp set a try - just beautiful.

Make today a creative day!
Kathie K.


Wednesday, March 30, 2022

Asian Crane Screen Card

 Beautiful. Elegant. Classy. These are the comments I have received about this new card. This card is so versatile with sentiments and images that can be used for any occasion. And its easier than it looks.


Below are the materials and supplies I used to make this card. However, use what you have. Tip: pick a designer series or pattern paper that you like and use that for your color inspiration. I used gray, copper and gold for this card.

The finished size when folded is 8 1/2 x 3 1/2 and fits into a standard #9 business envelope. This card will need extra postage if mailed.

Supplies:

  • Cardstock and paper:
    • Base cardstock/Basic Grey - 8 1/2 x 11
    • Top and bottom layer panels - Basic Black - cut 8 - 2 5/8 x 1 1/8
    • Designer/Pattern Paper:
      • Top - cut 4 - 2 1/2 x 1
      • Bottom - cut 4 -  2 1/2 x 1
      • 4th panel - 3 3/4 x 2 1/2
      • Back - cut 3 - 6 1/8 x 2 1/2
    • Back layers - Basic Black - cut 4 - 6 1/4 x 2 5/8
    • Gold Shimmer:
      • 1st and 4th panels - cut 2 - 3 7/8 x 2 5/8
      • Scraps for die cuts
    • Copper Shimmer - 2nd and 3rd panels, cut 2 - 3 7/8 x 2 5/8
    • White:
      • Front: 1st panel - 3 3/4 x 2 1/2, and scrap for sentiment
      • Back: 3rd panel - 6 1/8 x 2 1/2
  • Stamps - I used new and retired sets from Stampin' Up - All Good Things (ret), Bamboo Beauty and Crane of Fortune
  • Ink - Smokey Slate (Stampin' Up)
  • Border Punch
  • Label Punch
  • Dies - Crane of Fortune (Stampin' Up)
  • Copper ribbon
  • Adhesive
  • Bone folder
  • Dimensionals
Instructions:
  1. Score along the 11" side - 2 3/4, 5 1/2 and 8 1/4
  2. Use the border punch on the top edge
  3. Use the label punch along the bottom edge to create the legs
  4. Layer the designer/pattern cardstock pieces to the basic black layers (you should have about a 1/16" border) and one piece of designer/pattern cardstock (3 3/4 x 2 1/2) to one of the gold panels
  5. Layer 1 white panel to gold layer
  6. Stamp words to scrap and punch out with label punch; stamp images in Smokey Slate to the smaller white panels for the front and larger white panel for the back
  7. Layer 2 smaller white panels to copper layers
  8. Layer the larger white panel to black
  9. Adhere the all the layered pieces to the panels as shown in the pictures
  10. Die cut images from gold shimmer and arrange on the first and last panels; pop up the words that were punched out and layer on top of gold die cuts
  11. Tie a bow with copper ribbon and place on last panel.

I hope you give this design a try - its so worth it and your friends and family will love it.

Here's a short video to show you how its works.


If you would like to order any of the Stampin' Products, please use this month's host code: 4HKYNC94

If you would like to purchase this card, it's available here on my Etsy shop - HandmadeByKathieK

Happy Crafting!

Friday, August 10, 2018

Layering die cuts

Hello fellow stampers and card makers,

I hope you are off to good start to your weekend! Here's a card that I really enjoyed making. And it's almost all die cuts.


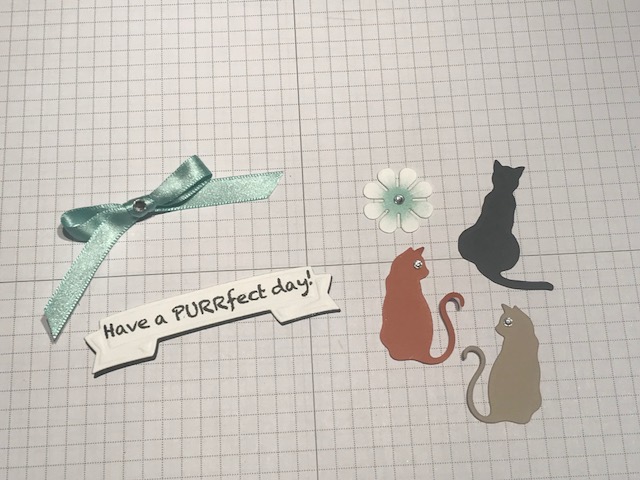
I first cut all the cardstock to the size of card I want and die cut the images. The base of the card is made from black cardstock and the background is made from teal. This layer is dry embossed using a honeycomb pattern. The cats are cut from three different colors - black, tan, and rust. The labels are cut from light teal or aqua, black and white.


I then made the embellishments. I used an aqua satin ribbon with a crystal rhinestones that will be attached to the main focal point. The sentiment is stamped in black on the white banner label. To give it added dimension, a black banner is also cut and adhered slightly offset to make a shadow. I also added rhinestones as eyes to the cats and as the center of the flower (used a sponge dauber to color the center of the white flower).


To make the focal point of the card, I cut the aqua colored labels in half as shown below. The aqua labels are the same size as the white. I adhered each end of the longer label under the black label. Then I adhered the smaller aqua labels under the white one with the aqua edge just visible. Then I attached that piece on top of the black label. Layered on the cat die cuts so the tails just touch (almost looks like a heart). Then attach the label and the flower, and the focal point is done.


I attached the dry embossed background piece to the card base. Then added the layered label focal point and the sentiment. I also added a white piece of cardstock to the inside of the card and stamped paw prints in the bottom corners as well on the envelope.


This makes a great birthday card for those cat lovers in your life. I hope you give die layering a try to make focal points for your creations.

Happy stamping!

Kathie K.

Saturday, July 28, 2018

Stretching Your Dies For Stunning Results

Hello fellow stampers and card makers!

I will admit, I am addicted to die cutting. There are so many die sets and bundles on the market its sometimes hard to see beyond what the dies were originally designed to do. Well that's easier to do than you think.


For this first communion card, I mixed and matched several brands and designs to make a stunning focal point.

I used white and gold shimmer paper although its hard to tell from the photo. It's not necessary to use shimmer paper but it does make the card that much more special and elegant. On top of the base card, I layered a slightly smaller lavender piece that I had dry embossed. Using a slightly smaller white piece, I die cut the ornate oval (Spellbinders). For the chalice, I used a circle die from Stampin' Up. I cut the top 1/3" off to made the bottom. The host above the chalice is done using two sizes of circle punches.


The finishing touches include embossing the sentiment in gold which was cut using a banner punch. I add sheer lavender ribbon for the extra special touch.

Start thinking outside the die box, and mix and match for stunning results.  I hope you give this a try.

Happy stamping!

Kathie K.

Airplane easel birthday card

  Crafting Joy: A Beautifully Designed Handmade Birthday Card Birthdays are a celebration of life, love, and the joy of making memories. Wha...