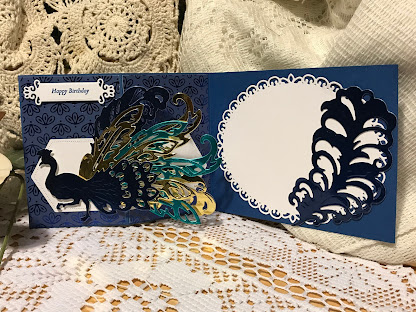
This peacock birthday definitely has the wow factor. The elegant foil cardstock combined with the fun, Z-fold will wow any recipient. And its so easy to make.
The card expands to 11" and folds to an A2 size (5 1/2 x 4 1/4) and fits nicely into a standard envelope. I chose a blue color pallet but any color combination will work great. Here's what you'll need:
- Blue cardstock cut to 11 x 4 1/4; score at 2 3/4" and 5 1/2"
- Designer paper with a blue foil design - cut 2 panels 4 1/8 x 2 5/8
- White cardstock for floral oval, sentiment tag and hexagon dies (approximately 4 1/4 x 5 1/2)
- Cut 2 hexagons; trim each one to 2 1/2" long
- Blue, gold and light teal foil/mirror cardstock - enough to cut feathers and peacock:
- Blue - cut peacock, large feather, medium feather
- Gold - cut triple feather, medium feather, small swirl feather
- Teal - cut triple feather, and small swirl feather
- Anno Griffin Peacock and Feathers die set
- Spellbinders Floral Oval die set
- Stampin' Up Fancy Frames die set
- Teal rhinestones (not pictured)
- Happy birthday stamp
- Peacock feather stamp for envelope (Hero Arts Color Layering Peacock)
Instructions:
- Make the Z fold using the score lines
- Attach designer paper to first two panels
- Place the large oval die white cut in center of large blue panel and adhere; attach large blue feather along right side of oval
- Attach the cut hexagon die cuts lining up the cut ends at the fold; this will become the base that the peacock and feathers will attach to.
- Build the peacock by attaching the feathers to the back of the blue peacock; start with the gold and teal triple feathers; add the medium blue feather, gold and teal swirl feather and finish with the gold medium feather towards the bottom. Tip: Glue dots work great for attaching the feathers; make sure the feathers do not hang off the card base when folded.
- Using dimensionals, adhere peacock to the front panel.
- To finish off the card, attach small teal rhinestones to the peacock for the eye and add to sentiment die cut.
I hope you give this card a try. It so much easier than looks and will be sure to impress.
Happy card making!
Kathie K.


No comments:
Post a Comment